To install and run Flutter, your development environment must meet these minimum requirements:
- Operating Systems: macOS
- Disk Space: 2.8 GB (does not include disk space for IDE/tools).
- Tools: Flutter uses
gitfor installation and upgrade. We recommend installing Xcode, which includes, but you can also installgitseparately.
Get the Flutter SDK
- Download the following installation bundle to get the latest stable release of the Flutter SDK:flutter_macos_2.10.3-stable.zip
For other release channels, and older builds, see the SDK releases page.
- Extract the file in the desired location, for example:
$ cd ~/development $ unzip ~/Downloads/flutter_macos_2.10.3-stable.zip - Add the
fluttertool to your path:$ export PATH="$PATH:`pwd`/flutter/bin"This command sets your
PATHvariable for the current terminal window only. To permanently add Flutter to your path, see Update your path.
You are now ready to run Flutter commands!
Run flutter doctor
Run the following command to see if there are any dependencies you need to install to complete the setup (for verbose output, add the -v flag):
$ flutter doctor
This command checks your environment and displays a report to the terminal window. The Dart SDK is bundled with Flutter; it is not necessary to install Dart separately. Check the output carefully for other software you might need to install or further tasks to perform (shown in bold text).
For example:
[-] Android toolchain - develop for Android devices
    • Android SDK at /Users/obiwan/Library/Android/sdk
    ✗ Android SDK is missing command line tools; download from https://goo.gl/XxQghQ
    • Try re-installing or updating your Android SDK,
      visit https://docs.flutter.dev/setup/#android-setup for detailed instructions.
The following sections describe how to perform these tasks and finish the setup process.
Once you have installed any missing dependencies, run the flutter doctor command again to verify that you’ve set everything up correctly.
Downloading straight from GitHub instead of using an archive
This is only suggested for advanced use cases.
You can also use git directly instead of downloading the prepared archive. For example, to download the stable branch:
$ git clone https://github.com/flutter/flutter.git -b stable
Update your path, and run flutter doctor. That will let you know if there are other dependencies you need to install to use Flutter (e.g. the Android SDK).
If you did not use the archive, Flutter will download necessary development binaries as they are needed (if you used the archive, they are included in the download). You may wish to pre-download these development binaries (for example, you may wish to do this when setting up hermetic build environments, or if you only have intermittent network availability). To do so, run the following command:
$ flutter precache
For additional download options, see flutter help precache.
Update your path
You can update your PATH variable for the current session at the command line, as shown in Get the Flutter SDK. You’ll probably want to update this variable permanently, so you can run flutter commands in any terminal session.
The steps for modifying this variable permanently for all terminal sessions are machine-specific. Typically you add a line to a file that is executed whenever you open a new window. For example:
- Determine the path of your clone of the Flutter SDK. You need this in Step 3.
- Open (or create) the
rcfile for your shell. Typingecho $SHELLin your Terminal tells you which shell you’re using. If you’re using Bash, edit$HOME/.bash_profileor$HOME/.bashrc. If you’re using Z shell, edit$HOME/.zshrc. If you’re using a different shell, the file path and filename will be different on your machine. - Add the following line and change
[PATH_OF_FLUTTER_GIT_DIRECTORY]to be the path of your clone of the Flutter git repo:$ export PATH="$PATH:[PATH_OF_FLUTTER_GIT_DIRECTORY]/bin" - Run
source $HOME/.<rc file>to refresh the current window, or open a new terminal window to automatically source the file. - Verify that the
flutter/bindirectory is now in your PATH by running:$ echo $PATHVerify that the
fluttercommand is available by running:$ which flutter
Platform setup
macOS supports developing Flutter apps in iOS, Android, and the web (technical preview release). Complete at least one of the platform setup steps now, to be able to build and run your first Flutter app.
iOS setup
Install Xcode
To develop Flutter apps for iOS, you need a Mac with Xcode installed.
- Install the latest stable version of Xcode (using web download or the Mac App Store).
- Configure the Xcode command-line tools to use the newly-installed version of Xcode by running the following from the command line:
$ sudo xcode-select --switch /Applications/Xcode.app/Contents/Developer
$ sudo xcodebuild -runFirstLaunch
This is the correct path for most cases, when you want to use the latest version of Xcode. If you need to use a different version, specify that path instead.
- Make sure the Xcode license agreement is signed by either opening Xcode once and confirming or running
sudo xcodebuild -licensefrom the command line.
Versions older than the latest stable version may still work, but are not recommended for Flutter development. Using old versions of Xcode to target bitcode is not supported, and is likely not to work.
With Xcode, you’ll be able to run Flutter apps on an iOS device or on the simulator.
Set up the iOS simulator
To prepare to run and test your Flutter app on the iOS simulator, follow these steps:
- On your Mac, find the Simulator via Spotlight or by using the following command:
$ open -a Simulator - Make sure your simulator is using a 64-bit device (iPhone 5s or later). You can check the device by viewing the settings in the simulator’s Hardware > Device or File > Open Simulator menus.
- Depending on your development machine’s screen size, simulated high-screen-density iOS devices might overflow your screen. Grab the corner of the simulator and drag it to change the scale. You can also use the Window > Physical Size or Window > Pixel Accurate options if your computer’s resolution is high enough.
- If you are using a version of Xcode older than 9.1, you should instead set the device scale in the Window > Scale menu.
Create and run a simple Flutter app
To create your first Flutter app and test your setup, follow these steps:
- Create a new Flutter app by running the following from the command line:
$ flutter create my_app - A
my_appdirectory is created, containing Flutter’s starter app. Enter this directory:$ cd my_app
- To launch the app in the Simulator, ensure that the Simulator is running and enter:
$ flutter run
Deploy to iOS devices
To deploy your Flutter app to a physical iOS device you’ll need to set up physical device deployment in Xcode and an Apple Developer account. If your app is using Flutter plugins, you will also need the third-party CocoaPods dependency manager.
- You can skip this step if your apps do not depend on Flutter plugins with native iOS code. Install and set up CocoaPods by running the following commands:
- Follow the Xcode signing flow to provision your project:
- Open the default Xcode workspace in your project by running
open ios/Runner.xcworkspacein a terminal window from your Flutter project directory. - Select the device you intend to deploy to in the device drop-down menu next to the run button.
- Select the
Runnerproject in the left navigation panel. - In the
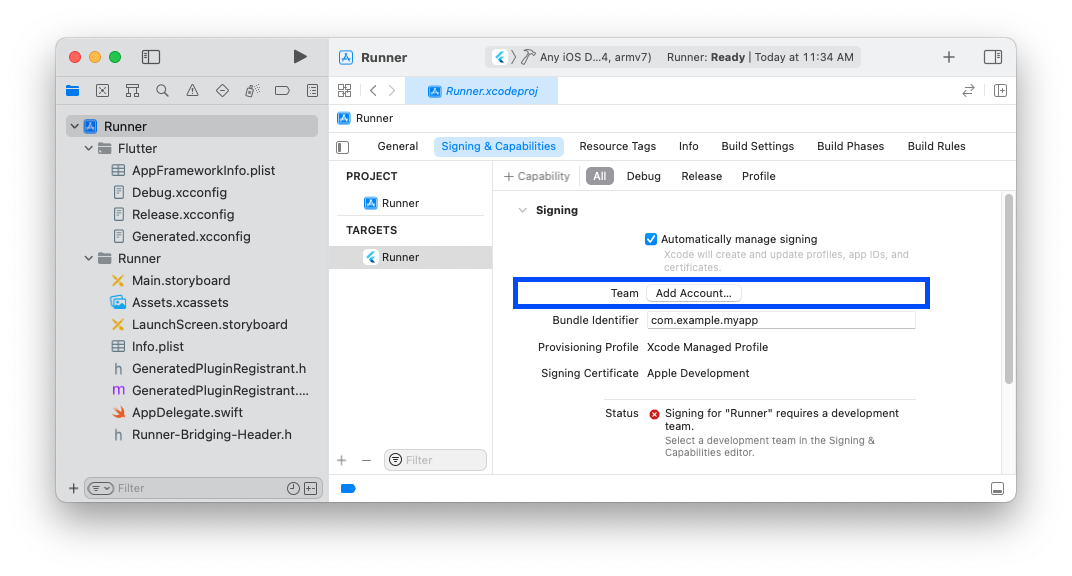
Runnertarget settings page, make sure your Development Team is selected under Signing & Capabilities > Team.When you select a team, Xcode creates and downloads a Development Certificate, registers your device with your account, and creates and downloads a provisioning profile (if needed).- To start your first iOS development project, you might need to sign into Xcode with your Apple ID.
 Development and testing is supported for any Apple ID. Enrolling in the Apple Developer Program is required to distribute your app to the App Store. For details about membership types, see Choosing a Membership.
- The first time you use an attached physical device for iOS development, you need to trust both your Mac and the Development Certificate on that device. Select
Trustin the dialog prompt when first connecting the iOS device to your Mac.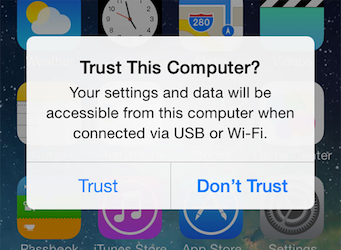
Then, go to the Settings app on the iOS device, select General > Device Management and trust your Certificate. For first time users, you may need to select General > Profiles > Device Management instead.
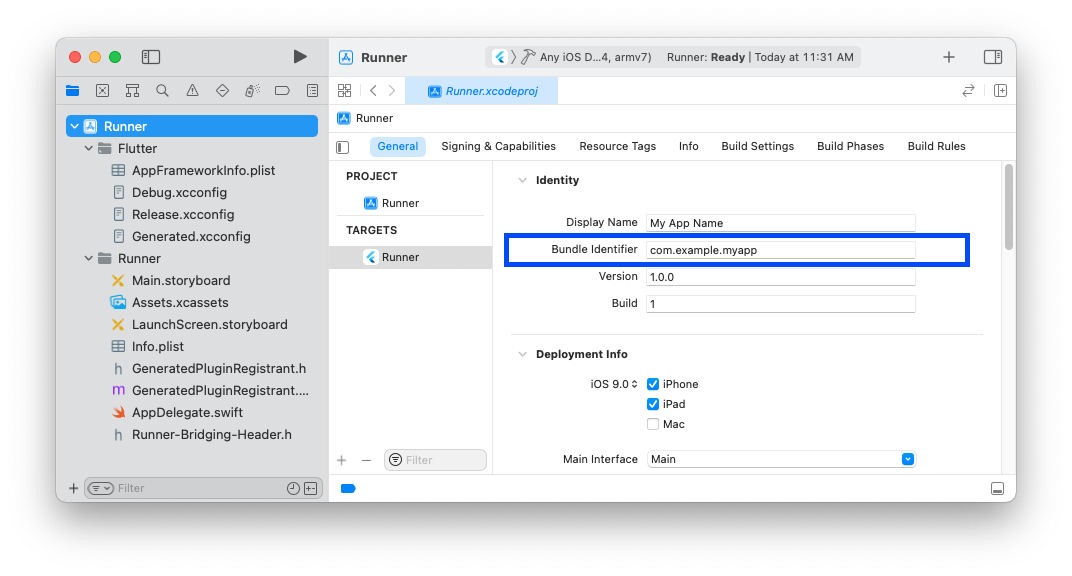
- If automatic signing fails in Xcode, verify that the project’s General > Identity > Bundle Identifier value is unique.
- To start your first iOS development project, you might need to sign into Xcode with your Apple ID.
- Open the default Xcode workspace in your project by running
- Start your app by running
flutter runor clicking the Run button in Xcode.