Step 1: Create a Firebase Project and Enable the Phone Authentication
First, we have to create the Firebase Project. For that, you have to go to Firebase console and create a new Project

After that, you will be asked for the Project name and some other details about the project and you are good to go.
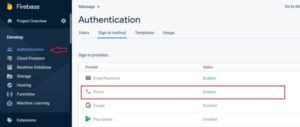
Next, go to the Authentication menu in Sidebar and enable the Phone Authentication option as shown in the above image.
Now we have to use the Firebase config to integrate it with the Ionic Application. For that go to Project Overview > Project Settings and scroll down you will get the firebase Config.
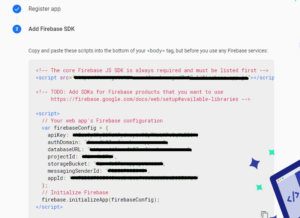
You can copy this Firebase config for now. Later on, will use them in the Ionic app to initialize the Firebase project.
Note: With latest update in Dec 2020, Firebase config does not include
databaseURLfor new projects. This can be an issue as several of the Firebase dependent libraries have not updated themselves to accept this change. In case you don’t see databaseURL in Firebase config, create the information yourself by writingdatabaseURL: <YOUR-PROJECT-ID>.firebaseio.com