Android Build requires using Android Studio Latest to run your app.
Build web assets and prepare your app for any platform targets.
ionic build will perform an Ionic build, which compiles web assets and prepares them for deployment.
ionic build uses the Angular CLI. Use ng build --help to list all Angular CLI options for building your app. See the ng build docs for explanations. Options not listed below are considered advanced and can be passed to the ng CLI using the -- separator after the Ionic CLI arguments. See the examples.
Step 1:
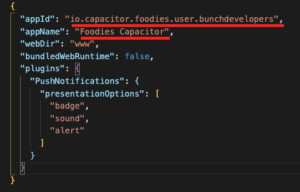
Change Package Name And Application Name of your App
Open File called capacitor.config.json on the root of your project
Step 2:
Create Production Build From this command
ionic build --prod
Step 3:
Add Android Platform to your Project
Add a native platform to your Ionic project
ionic capacitor add android
or
npx cap add android
This API requires the following permissions to be added to your AndroidManifest.xml:
<uses-permission android:name="android.permission.READ_EXTERNAL_STORAGE"/>
<uses-permission android:name="android.permission.WRITE_EXTERNAL_STORAGE" />
<uses-permission android:name="android.permission.ACCESS_COARSE_LOCATION" />
<uses-permission android:name="android.permission.ACCESS_FINE_LOCATION" />
<uses-feature android:name="android.hardware.location.gps" />
Step 4:
Sync ionic build with your Android Application
ionic capacitor sync
or
npx cap sync
Step 5:
Now Open Android Studio to create android release APK
ionic capacitor open android
or
npx cap open android
This will open your native Android project in Android Studio. The first time you open the project, it will perform a gradle sync which may take a little while. This will install all of the dependencies required for your project. Eventually, you should see that the sync has successfully completed:
Step 6:
Build a Signed APK
Once you are ready to submit your application, you will need to build a signed APK with Android Studio. An APK is just the file that is the packaged-up version of your application, and then that needs to be signed with a private key (Keystore). This is essentially just a way of proving who the application belongs to, and who has the authority to update it.
Just like with iOS applications, there are quite a few steps involved with publishing your application, so I would recommend reading through the documentation available on the Android website.
We will just be walking through the basic steps of signing and uploading an APK to Google Play. As I mentioned in the iOS tutorial, make sure that the application you are distributing is a production build of your application (i.e. a minimized/optimized one).
In order to build your signed APK, you should first go to Build > Generate Signed APK in the menu at the top of Android Studio, then click Next.
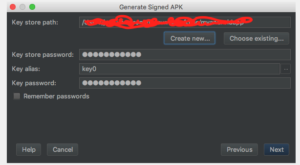
On this screen, you should supply your private key (Keystore file) for this project, or if you do not yet have a Keystore file you should select Create New.
It is critically important to keep this Keystore file safe, as you will need it to update your application on Google Play. If you lose it, it will be impossible to submit a new version of your application. When choosing a place to store your Keystore file, it is a good idea not to include it in the files that will be uploaded somewhere like GitHub. You should also protect this file by choosing a strong password (but make sure not to lose it!).
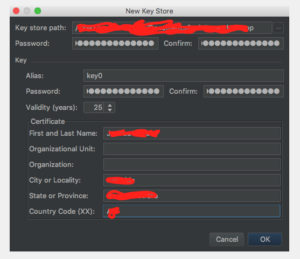
Fill out the details in this prompt, and remember to make note of the password you use and the alias. When you are done, click OK and then Next.
Make sure to choose the ‘release’ build type, and you should also tick both of the signature options:
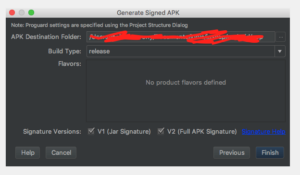
Once you complete this step, the application will begin building. Once it has finished you will be able to find your signed APK.
yourproject/android/app/release/app-release.apk