iOS Build requires using XCODE Latest to run your app.
Build web assets and prepare your app for any platform targets.
ionic build will perform an Ionic build, which compiles web assets and prepares them for deployment.
ionic build uses the Angular CLI. Use ng build --help to list all Angular CLI options for building your app. See the ng build docs for explanations. Options not listed below are considered advanced and can be passed to the ng CLI using the -- separator after the Ionic CLI arguments. See the examples.
Step 1:
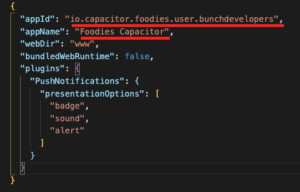
Change Package Name And Application Name of your App
Open File called capacitor.config.json
Step 2:
Create Production Build From this command
ionic build --prod
Step 3:
Add Android Platform to your Project
Add a native platform to your Ionic project
ionic capacitor add ios
or
npx cap add ios
iOS requires the following usage description be added and filled out for your app in Info.plist:
NSCameraUsageDescription(Privacy - Camera Usage Description)NSPhotoLibraryAddUsageDescription(Privacy - Photo Library Additions Usage Description)NSPhotoLibraryUsageDescription(Privacy - Photo Library Usage Description)
Read about Configuring Info.plist in the iOS Guide for more information on setting iOS permissions in Xcode
Step 4:
Sync ionic build with your Android Application
ionic capacitor sync
or
npx cap sync
Step 5:
Now Open XCODE to create ios release
ionic capacitor open ios
or
npx cap open ios
Sign up for the Apple Developer Program
In order to create iOS applications, you will need to enroll in the Apple Developer Program which has an annual fee of $99 for individuals and $299 for enterprises.
Install XCode
In order to run applications on your iOS device, and submit them to the App Store, you will need XCode. You can download this from the Apple App Store. In this example, we are using version 9.3 of XCode.
As well as installing XCode itself, you will also need to install Cocoapods and the XCode CLI tools. You can do that by running the following commands:
sudo gem install cocoapodsxcode-select --installOnce you have installed XCode, make sure to open it at least once so that it can install the necessary components.
From this point onwards, we are basically just dealing with a normal native project. We just have our web code bundled in there.